LUOVA

One great image, a hundred words and the video:

VirpiVainola_work.jpg

LUOVA

Luova helps self-directed art hobbyists tackle a lack of ideas and the fear of starting a piece. As a drawing companion app, it aims to inspire and get people drawing while encouraging a positive growth-mentality. It helps artists to avoid external pressure and insecurity by promoting appreciation for one’s own work, time efficiency and increased engagement with the act of drawing itself. Luova adapts to the artists’ individual needs with varying prompts, aids them in recognising their artistic achievements and personal improvement, and makes it easier to start a drawing process.

CRITICAL REFLECTION

At the start of the final year I knew I want to focus on learning more skills on creating and designing digital content, as this is relevant to my career prospects. During this project I did learn a lot about creating user experiences, designing UI elements for mobile, the constraints of the platform and its requirements for graphic design.

The idea of Luova started with people – I noticed a phenomenon and a habit that affects many hobbyist artists, and wanted to create a solution that serves those people and helps them find the appreciation and joy of drawing again.

PEOPLE

Many young hobbyist artists struggle to findsupportive materials for drawing with limited time and resources. This makes them feel discouraged to draw or present their work online due to insecurity. The social media-mindset and pressure reflects on personal drawing people cannot enjoy what they do and end up too frustrated to draw, even if they would be only drawing for themselves without any intention of publishing the work. As nowadays most of the art is exhibited online for free and creates a constant source of inspiring but at times overwhelming images, I believe it is important to reconnect with the individual’s drawing practise and find the appreciation for one’s own work.

As I set up the long initial questionnaire I got 44 answers from across the globe that gave me a great starting point and allowed me to further define the problem I was designing the solution for. Throughout the design process I collected feedback from people that belong to my target audience, but also interviewed professionals and teachers. Together they provided a lot of useful feedback and insights and allowed me to design a service that provides enough support during the drawing practise, but also gives agency for the user to meet their own goals.

At times it was also to difficult communicate the needs of the target audience and how their problems differ from those who have access to art education or who have a strong aspiration and are prepared to spend more time looking for resources. Based on my research, the main problems of art hobbyists are lack of time, resources, and insecurity, which makes maintaining a drawing practise difficult or stops one from drawing altogether. My research indicated that the best way to help them is not by providing conventional art education, but by getting them to draw more and more casually. The goal of Luova is to help find time for drawing and to guide people’s mindset from negative towards more positive and growth-oriented. Based on interviews I concluded that the best way to help artists with challenging tasks is to provide the missing tools and tips for learning a new technique but leave it up to the user to freely explore and implement them as they see fit for their own practise. This brings forth small advances, helps regain lost motivation and reconnects people with the joy of drawing as an activity.

Balancing the at times conflicting needs of the users was challenging, as creating a more organised and structured approach some artists preferred could at times end up too pressuring and discouraging for others. As it comes down to individual preferences, I found that it is important for the application to let the user to choose their own approach and take agency in building their own practise. Personalisation is also something that diffrentiates Luova from mere prompt generators, as Luova bases its prompts on the goals the user chooses and the user feedback after each prompt. This lets the user to choose themselves the best approach for drawing – whether it is drawing in one’s comfort zone to be able to draw anything at all or exploring new challenges.

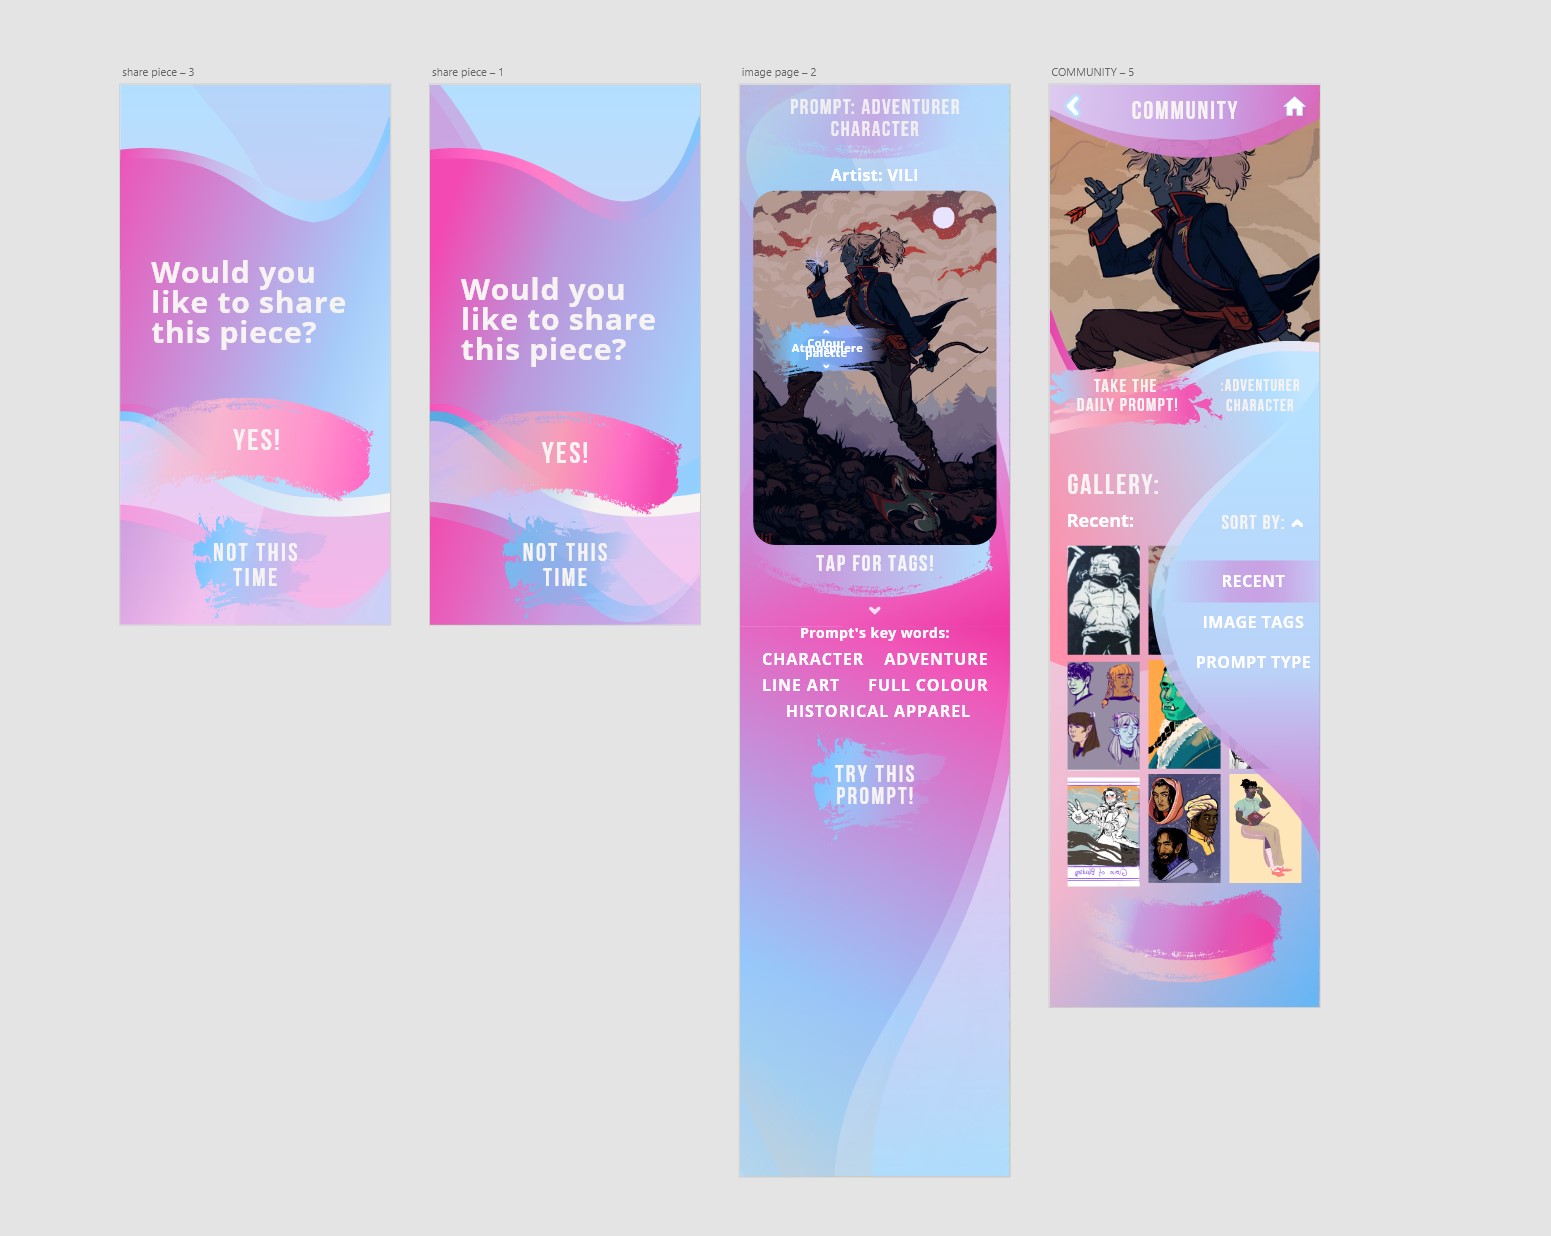
When researching the drawing practise overall and people’s relationship to art, the social side is an important part of it, especially nowadays as hobbyists connect mostly via online platforms. Social profiles and validation from others make people feel less alone. While my goal was to create an application with a friendly tone of voice to support the drawing practise, it was never supposed to replace feedback from other humans. Therefore I designed a social feature to maintain the sense of community. I came to the decision to restrict the social side within the application, leave out a following system and profiles, and include the full process behind an artwork instead of just finished pieces. The goal of this was to create a safe environment for both browse and exhibit one’s own work without the pressure of like-hunting or being too overwhelmed by heavily curated feeds. This enables the userbase to share their love for the works of others easily through the tagging system, while promoting the appreciation for art as a process.

Even though the target audience of Luova is hobbyists, I believe that the design of the application would also serve more experienced artists or beginners aspiring to be professionals in finding appreciation and enjoyment in their own work and building a routine for their drawing process.


DESIGN

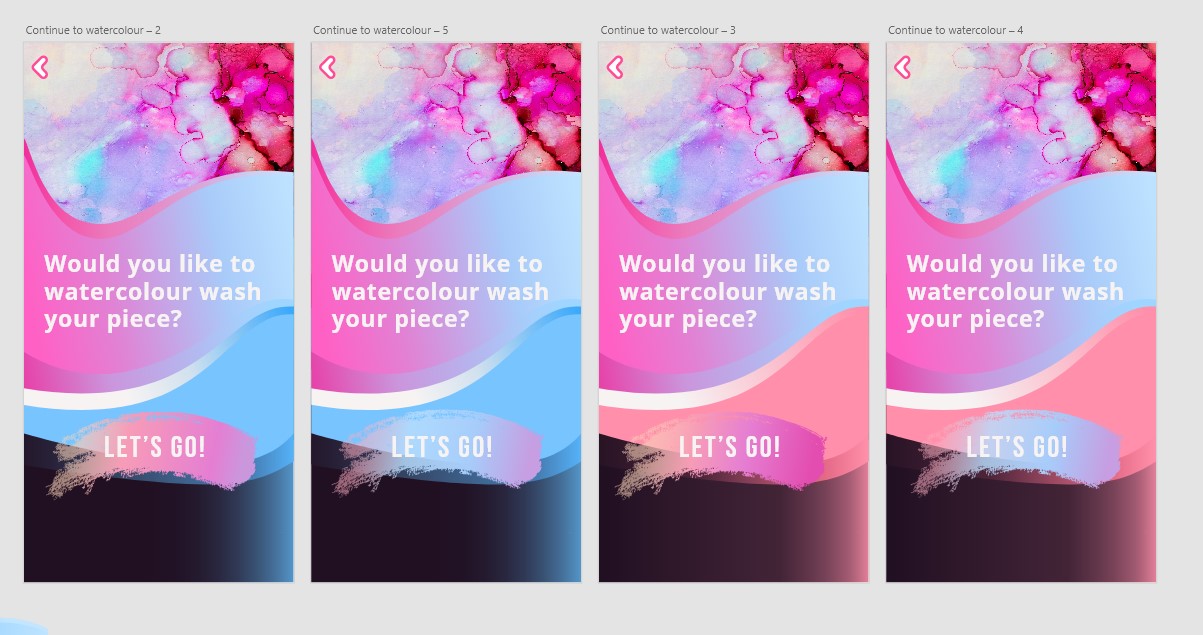
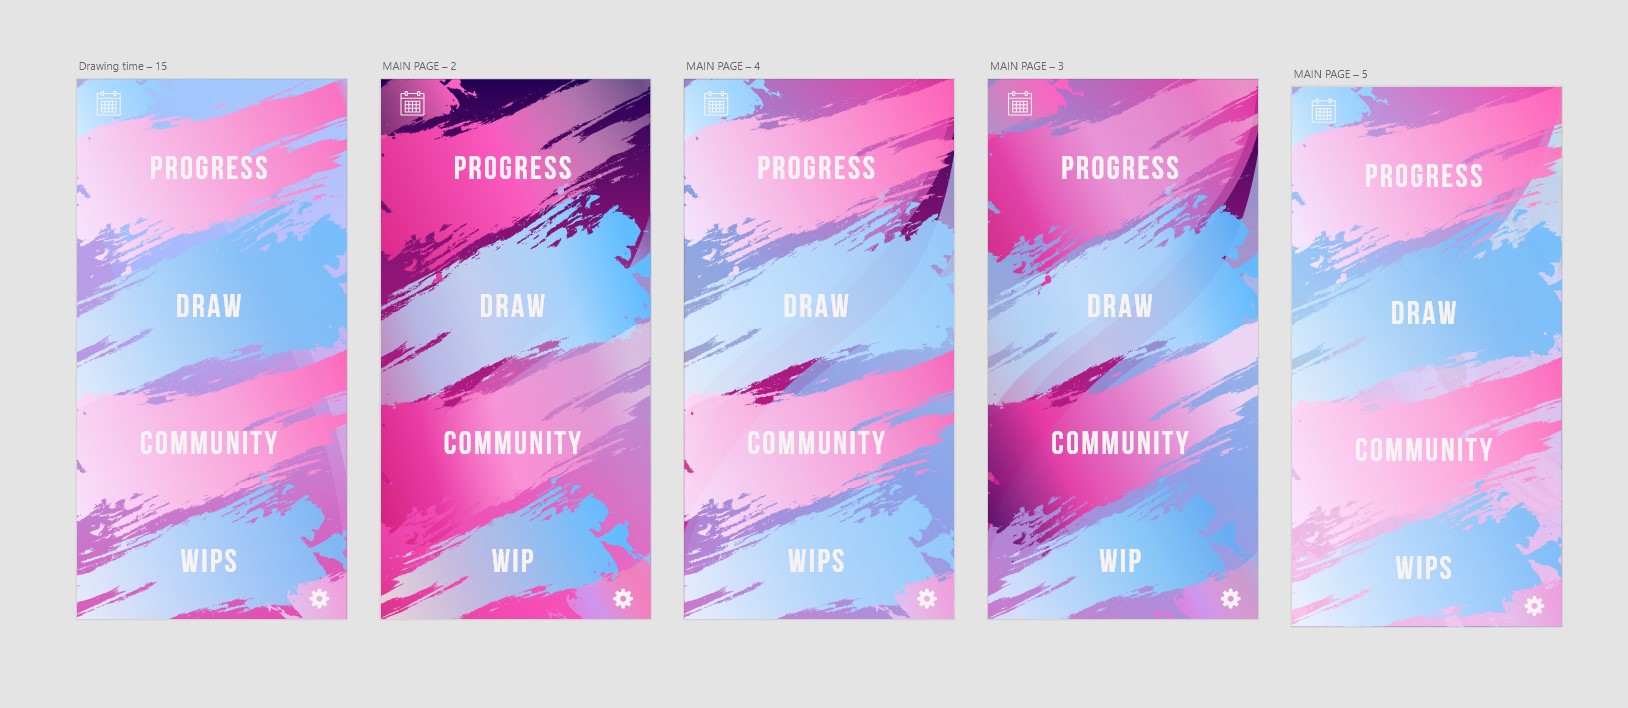
When it comes to the visual design, I wanted to create a service with a distinctive brand that stands out and reflects the creative nature of the application. It was a fun challenge to balance the colourful branding with the limitations of the platform in order to maintain a good information hierarchy and readability. In the beginning I wasn’t sure what platform to design for, but during the first stages of research I realised that most people use phones a lot while drawing, and thus it was natural to design for the same device.

These days even traditional drawing processes have a digital presence, as people search for reference materials and tutorials online while drawing, and exhibit and share their work in social media. However, no existing application combined snappy online tutorials with relevant reference images and a prompt generator. Based on interviews with people from the target group there is a definite need for one.

Mobile and social media was also the main source of distraction and insecurity that restricted people’s drawing practise. When people lose their focus from drawing, they first look at their phone. As the interviewed art teacher mentioned, it’s important to re-direct the focus back to the positive, provide small tips and help artists to get back into the flow. A companion application that is running when the user is drawing provides instant support and tips whenever the user gets stuck helps them to get back on track.

The reason to choose an application over a browser version was that people use browser for reading content, but applications for interacting. Additionally, a browser version could not have supported some features of Luova.

Prototyping and user testing early versions confirmed me the strenghts in the application’s structure as well as what parts needed more refining and clarification. First directing the artist’s mind back to the positive qualities was done just by asking the user to write, but this interrupted the flow between the stages. The visual tagging method instead was quick and easy, and along with the process animation it brought a new dimension to viewing a piece of art through iteration and happy accidents.

To help avoid distraction I split the prompt paths into more bite-sized stages that allow the user to take one step at a time and quit in the middle if they need to. Taking or importing an image after each stage is important to create the progress animation. However, at times it was challenging to decide where to draw the line between the stages, and thus I implemented the option to take unlimited process images during any stage, allowing the user to record more of their process if they want to.

Many people mentioned they have difficulties appreciating the work they have done, or they forget that they have drawn at all in their otherwise busy lives, contributing to the feeling of inferiority. Thus it was fitting to keep the user’s own progress timeline as part of the application, to visualise the user’s processes and small accomplishments.

Similarly to deciding the exact stages, it was difficult to determine the categories for the tags, as there are so many different things in artwork one could comment. I looked into what people usually comment on online pieces and picked the most repetitive comments that would work in combination with the visual marking overlay on top of an image.

TECHNOLOGY

ProtoPie worked well as a prototyping tool, as unlike many other available tools it allowed me to use variables to create high fidelity interactions and animations, which was important for prototyping the tagging feature. My familiarity with coding and using variables helped greatly in building the trigger-response actions within the prototype, and thus I was able to create well timed and working interactive parts.

However, as ProtoPie is a fairly new tool, the scale of the full application required too many screens, and my project hit the maximum capabilities of the tool. The phone I use to demonstrate the prototype hit the limits of its processing power, and ProtoPie did not support prototypes as large as mine with multiple interactive parts. Unfortunately I had to sacrifice image quality and resolution, as well as leave out some of the routes within the application to reduce the size of the prototype and make it feasible to be run with the ProtoPie engine. I had already designed and built prototypes of the features, so I captured the rest of the routes on videos that can be viewed here in the blog.

If I had more time during this project, I would spend more time testing the user journey on different prototyping tools to see which one is best for demonstrating the interactive parts. I would also refine the overall flow of the application and create smoother natural transitions between different screens, as well as improve the information clarity in the tagging screens and the relationship between the tags and individual comments on the social side.

Overall this project allowed me to develop a good understanding of the visual and prototyping challenges on the mobile platform, compared to the desktop environment I have more experience with. It was fun to create interactions that use touch as a trigger and design screens in smaller scale. I also enjoyed the overall project management and  managing multiple routes along with the design and interactivity state of multiple screens. This project honed my skills as an interaction designer, from UI and UX to graphic design and branding, giving me a good base on developing my career in interactive media.

VIDEO: OWN PROGRESS

Own progress timeline is one of the features that encourages the user to shift their mindset to more positive and helps them to recognise their own strengths and accomplishments. Whenever the user has drawn something, it is saved to the user’s own progress timeline along with the process gif, tags and comments the user has added. If the user has shared the work in the community side, it also includes other people’s tags and comments. This own progress timeline visualises the user’s improvement and drawings over time, and includes even the small sketches that many would otherwise forget, reminding the user of their small accomplishments, which is useful especially for people with otherwise busy schedules. The own progress timeline can be filtered based on time: “recent”, “month “or “year”, which changes the view of the display. It can also be filtered based on prompt types, such as showing only “daily prompts” or pieces drawn in the “relax” prompt path. Additionally, the user can also filter them based on image tags – for example, if the user chooses “image tags” and then “atmosphere”, the gallery view changes to show artwork that have the most “atmosphere” tags on them. This allows the user to see what their work excels in.

WIPS: If the user wants to quit during a prompt path after a stage, they have an option to quit permanently or continue the same path later. If they choose the latter, their work will be saved as an WIP (work in progress), to a separate WIP gallery. From this gallery the user can continue an existing piece and its prompt path. During research many people mentioned that they have difficulties deciding which WIP to continue. Therefore the WIP page also includes a feature that rolls a random WIP image for the user to continue.

VIDEO: Community

Whenever the user wants to quit – no matter if it is after a completed prompt path or after one stage, the user has the option to share their image along with its process and tags to the community. The community consists not only of people’s finished artwork, but of the process behind it, and shows the tags and comments on what each artist likes and enjoyed in their own work at each process stage. During research people mentioned how refreshing it is to see other artists’ WIP work or sketches, but there are not many of them in social media as most of the artwork published is fully finished and polished, which then adds to the artists’ own insecurities. A closed community within the application is a safe environment to publish one’s own work, even if it’s not “perfect” or is only a sketch, while simultaneously allowing the user to see other people’s work and the process behind them. This also allows them to see how even small steps contribute to the overall process and improvement of a piece. The community view can be filtered based on “recent” images, or on prompt types such as the “challenging” prompt type. It can also be filtered based on image tags, such as “line art”, which shows the processes of artwork with a lot of “line art” -tags in them.

In the community the users can leave tags on each other’s artworks at all stages. The interaction works similarly to when the artist tags their own work. Additionally, the users can also leave open comments to each other’s’ work. Visual tags are an easy way to show what people like in each other’s work from sketches to coloured pieces, maintaining a positive environment. The user can browse the comments and tags other people have left in the user’s own work, and see what other people like in their work at different stages.

If the user feels inspired by someone else’s work in the community, they can draw the same prompt. The community side also features a “daily prompt”, and pieces created by users on that prompt path are displayed as a slideshow in the community.

VIDEO: Tagging and feedback


I found out in my research that when people can see their own personal improvement and accomplishments, it makes them feel more confident and helps them to overcome their insecurities. One goal of my app was to shift the user’s mindset towards more positive and growth-oriented thinking, and thus along with own progress timeline, congratulations on drawing streaks and encouraging in-between screens, the tagging feature is an important part of the goal.

Process animation and tagging: After each prompt stage, the application displays a gif of the user’s progress so far (constructed of the images the user has taken or imported), after which it displays a slider that allows the user to browse all process images individually.  The user can visually tag what they like at each image if they press the phone screen. For example, if the user has taken multiple images when sketching, the user can individually tag all of those process images, thinking of what qualities they like in each one of them. When moving forward in the prompt path, the user’s progress gif and slider includes more process images, as it builds on the existing ones. After each stage the application encourages the user to tag the new stage images. The visual tagging method allows the user to choose a part of the image they like, and then choose a suitable “tag”, a word from a list of words that describes what they like in that part. In addition to the tags, after each stage the user also has an option to freely write a comment on what they enjoyed when drawing the stage, and what they are happy with in their work. Whenever the user is finished, no matter if they completed the prompt path or quit in the middle, the process so far is saved to the user’s own progress timeline, and shared to the community if the user wants so. The process animation, tags and comments leave a record of a positive experience and value the entire process behind each image.

Feedback: After completing a prompt path, the application asks the user to quickly submit their opinion on the subject and media used. The application uses this data to record what the user likes and what their comfort zone is.

VIDEO: Drawing process and supporting materials


  • Recording one’s work at different stages: Each prompt path is split into smaller stages, making it easier for the user to take one step at the time. For example, a full colour watercolour image with line art is split into three stages: sketching, line art and colouring. Luova provides customised support for each of the stages. During each stage the user has an option to take a photograph of their traditional, physical artwork, or import an image from a digital drawing software. The user can take or import as many progress images as they want. No matter how many WIP photos the user takes during the stage, after each stage the application asks the user to take or import at least one image. For example, the user can take multiple images of their sketch progress during the sketching stage, but they are asked to take at least one when they are finished with sketching. The application uses the images to assemble an animated progress gif displaying the process of the artwork so far.


  • Supporting materials: All research participants had difficulties finding relevant reference material or tutorials when drawing. Luova filters only relevant images or tutorials for each prompt, allowing the user to focus on drawing instead of spending their time trying to find relevant inspiration, reference images or tutorials. These customised supporting materials help the user when faced with shortcomings or insecurity, and make it easier to re-direct the attention to the drawing process. The supporting tips and reference images are immediately at hand when the user feels frustrated with a certain medium or subject.


  • The supporting materials consist of the following:


  • Tutorials: The tutorials are customised for each prompt type, stage and the available media. For example, during a sketching stage the tutorials focus on how to sketch the subject; perspective tips for prompts about landscapes, anatomy tips for drawing human characters, or tips for drawing clothing folds and details in character design related prompts. The prompt paths consist of stages, and each stage is continuous to the previous one. After the sketching stage, depending on the prompt and the media, the tutorials focus more on the used technique or tips for using the selected media. For example, the tutorials could provide a collection of tips on how to use liquid ink, how to use markers, or tutorials around different watercolour techniques. During all prompt paths the tutorials can be accessed from the stage menu, but during a “challenge” prompt path, a short tutorial is also displayed to the user before continuing to the drawing stage, thus introducing the idea or principle quickly for the user.
  • Inspiration & reference: In addition to tutorials, the user can access a gallery of images based on the subject and the stage of the prompt path. These images act as both inspiration and reference. The images are sorted under different categories. For example, during a prompt that suggests sketching a city street, the gallery images consist of categories such as “environment” – images of different city streets with different atmospheres, “objects” – images of miscellaneous objects that one could find from the streets, as well as “people”—images of different people one could add to a drawing of a city.

Video: Prompt paths, media and time

  • Time: During each prompt the user can choose how much time they have available at the moment, thus allowing the application to find a suitable prompt that fits the timeframe the user has available. Ideally the application would collect data on how long the users approximately spend drawing different prompts, thus maintaining a database used to determine the prompt type length.
  • Media: Choosing the available media each time allows the application to find a prompt that matches the media the user has available, instead of having to go through a prompt without suitable supplies. For example, if the user only has access to pencils, the application would not recommend a prompt focusing on watercolours.
  • Different prompt types:  Luova does not provide traditional art education, but it has some elements that relate to it in order to help artists who struggle with individual facets of the process, such as a certain technique or finding inspiration. Most people in my target group benefit from additional tips and materials, such as reference photos, small guides, given subjects, mood boards etc. being immediately at hand. When initiating the drawing process, the user has an option to choose from multiple prompt types: relaxing, challenging, practise, or their own idea. As the users have varying needs every time they want to draw, the selection provides an option for their current mood. Each of these prompt types takes into account the user’s set goals when recommending a particular prompt from within the category.The differences between each prompt category are the following:


  • Relax: Providing an option to do something relaxing and easy is important when addressing the issue of not drawing because of insecurity. Many people mentioned during research that it’s important to just get the drawing process started without any pressure, and sometimes it’s valuable to just draw something comfortable and familiar to engage with the drawing process again. This prompt type generates a prompt based on what the user is comfortable drawing and what they usually draw, with an easy medium to use. This is decided based on the data collected during the initial setup questionnaire and the user feedback after each prompt. For example: if the user chose that they usually draw human characters with a digital drawing software, a relaxing prompt would suggest something similar to the user, such as “draw a character in beach attire”. This prompt type is also shorter and more casual than the other prompt types, yet it still provides the relevant supporting materials.


  • Challenging: Challenging option is for people who are looking to try and explore a new medium, technique or subject. This prompt is based on the user’s goals: what the user would like to draw more, and what they are unfamiliar with. A challenging prompt path is longer and it features an additional tutorial before each drawing stage. For example, if the user wants to draw more landscapes using ink and watercolours, but has no experience with neither, the application introduces the subject and the medium for the user. Luova helps the user with the sketching stage and then provides an option to continue building on their sketch and move to the next stage on the drawing path. When moving to the inking stage, Luova provides a quick tutorial on how to use liquid ink. During the stages the user can also access the tutorials from menu, as well as browse inspiration material related to the prompt and stage. When the user is finished with that stage, they have the option to continue to colouring their inked work with watercolours, where the app provides a tutorial on watercolour techniques, as well as watercolour related inspiration. Luova supports the user in exploring the new subject and medium throughout the prompt path.


  • Practise:  Practise is for people who want to sketch something in short time. It follows a croquis-like structure and shows the user a series of quick images around a certain topic. For example, a practise prompt could consist of animal images the user is supposed to sketch in limited time. Quick sketches encourage the user to produce low-fidelity drawings that focus on the basic shapes and an essence of an animal, rather than a detailed realistic piece. Like other prompt types, practise prompts also include tutorials such as how to split animals into basic shapes to make sketching easier.


  • Have an idea: This prompt is not generated by the application. Instead it allows the user to draw their own idea using the supporting materials of the application. The user can choose the media and narrow down a subject the tutorials and reference images are based on, thus creating their “own prompt”. For example, if the user wants to draw a still life image of kitchenware using markers, they don’t have to wait for the application to create a suitable prompt, as they can choose what topic they want the supportive materials to be based on. Luova then provides inspiration and reference images of kitchen utensils, along with tutorials on how to use markers as a medium.

VIDEO: Application setup and notifications

  • Login / register: The username is also the user’s artist name, displayed to other users in the community.
  • Background questions: The purpose of these questions is to find out what media the user has available, what they are familiar with and what subjects the user usually draws. This determines their comfort zone for the application, helping Luova to choose “relax” prompt suggestions based on what the user is comfortable drawing. Additionally, the application asks the user about their goals: what media the user would like to familiarise themselves with, and what subjects they would like to draw more. The app adjusts the prompts according to these desires, especially during the “challenge” and “practise”-prompts, introducing the user to unfamiliar techniques they are interested in.
  • Schedule: As the goal of the application was to help hobbyist artists to engage with drawing more frequently, Luova asks the user to input suitable times for drawing according to the user’s own schedule. The schedule can be later accessed from the application’s home page via the calendar icon. As hobbyists with other full-time careers often have very limited time for drawing, providing scheduled notifications for them to remind them of possible drawing slots is useful and helps with the lack of time. The user can also sync their schedule with other applications, such as Google or Apple calendar.

LIMITATIONS FOR THE FINAL PROTOTYPE AND PROBLEM SOLVING

I’m happy with the final branding of the prototype, and tested the text field input in combination with it to see how it works in animations:


As the branding is taking its final shape, I have ran into other problems when assembling the final prototype. These problems are caused due to the limitations of ProtoPie. An example of a smaller issue I managed to overcome was layering multiple large reference images over each other. The changing the opacity value created issues with button hit areas, and thus I had to create a paging scroll that travels to the assigned image to solve the problems with the interaction.  The transition is not as smooth, but the interaction was the priority. The following video demonstrates the difference:


Later I ran into a bigger issue, as the Android phone I’m using to demonstrate the prototype has a very high resolution. This means that the image quality in the prototype needs to be very high to prevent heavy pixelation on the device screen. In the end the prototype had too many images and become too heavy to run smoothly. Since the prototype includes multiple screens and images, the file size became too large and caused problems when saving, crashing the prototyping tool and the prototype on phone multiple times. When trying to solve the problem I tried changing the resolution of the prototype as well as the density of the rendering, but as ProtoPie converts vector images into bitmaps the images pixelated heavily on the device screen. I went back and forth with the ProtoPie customer support, but in the end I simply needed to reduce the quality and fidelity of the application to maintain a smaller file size. This means I had to split the prototype into multiple different files to ensure all interactions could be run, as one large prototype required too much processing power. It is unfortunate I cannot exhibit all the full features and routes I created and assembled for the prototype, but I will display videos in this blog to show them and leave only the core user journey for the live prototype demonstration. Even then I need to compromise the image quality in the prototype and split the resolution to ensure the prototype’s interactions can be run as intended. Similarly, not all gallery images will open in the live demo, as mapping the full prototype would have required too much from the prototyping tool and from the ProtoPie engine.

MOVING ON TO THE FINAL PROTOTYPE

Annotation 2019-03-30 182724

After Mark 2 I gathered more feedback on the prototype. People described the visual style as friendly and inspiring, and I’m happy that it meets my goals on that. I have changed the colour palette slightly towards a more uniform, colder palette, as well as smoothed out the organic shapes, as people preferred them more. I also changed the drop down menu designs to less cluttered ones, while still keeping the paint splash elements in most button press options.

Annotation 2019-04-08 201845
Iterating the final visual design

The prompt path structure got a positive response, and now the focus is on smoothing out the interactions with some in-between animations and iterating the graphic design to create a better information hierarchy.

The word cloud in the home page was too distracting and messy, so instead I created a small statistics page that shows “what’s in” using a few key words. The page shows the user’s own current top tags for their own work, as well as others’ top tags for the user’s work. The page also has an option to change the user’s goals within the application, thus changing the recommendation preferences for the prompts. I have also added more in-between animations and welcome screens.

Annotation 2019-04-13 174122.jpg


Additionally, when the user browses someone else’s work in the community gallery, they can now see the difficulty of the prompt the drawing was based on, some key words describing the prompt as well as an option to take the same prompt if they are interested and inspired.

I have also thought about aligning the images for the gif and come to conclusion that with digital imported images that can be easily done. With photographed drawings the application could use corner alignments or image recognition to smoothen the animation. Then again, even if the photographed images would be skewed or from an angle, as long as the user can see their own work they will be able to tag the parts they like in it.

I also thought how the tags would be visually displayed without being cluttered when the user gets multiple tags from other users. As the point of the tags is to provide an overall visual cue of what others like in the work, one way could be showing a fading animation of different tag clusters at each stage, that the user would then be able to tap open. However, due to the limitations of ProtoPie and the time it takes to assemble the interaction for each of the tagging circles, I am not able to demonstrate a full changing animation of tag clusters in this prototype.

Other limitation is in remembering the user’s tags at each stage – as ProtoPie does not support any kind of temporary memory system, the prototype is not able to remember what the user tagged live and then display the same tag in gallery or in the process timeline. I will create an example of the user added tags and comments for the progress timeline and community, and still have the free tagging interaction after each stage to demonstrate how the interaction feels.

Here are some screen iterations for the final design:


Annotation 2019-04-03 204458

Annotation 2019-04-08 201234

Annotation 2019-04-08 201801Annotation 2019-04-08 201427Annotation 2019-04-08 201137Annotation 2019-04-08 201601

The design guideline for the final prototype:

visual-guide-app